Jeep Wrangler: Bulb Replacement / LED Front Fog Lamp
If your vehicle is equipped with LED fog lamps they are replaced as an assembly.
Rear Tail, Stop, Turn Signal, And Backup Lamp
See below steps to replace:
- Remove interior trim panel cap to access
single retaining screw for tail lamp
assembly.
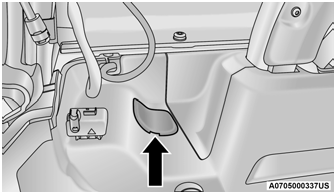
Trim Cap
- Remove retaining screw and disconnect
electrical connector, then remove tail lamp
assembly from the vehicle.
NOTE:
If necessary, push in on the assembly tab located inboard behind the lamp housing.
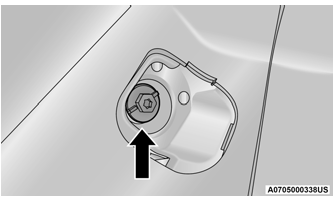
Retaining Screw
- Remove the three screws from assembly
bracket to access bulb sockets.
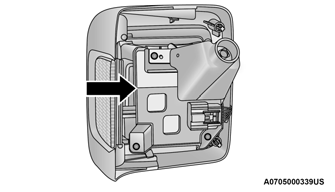
Assembly Bracket
- Rotate the appropriate socket a quarter turn counterclockwise, then remove it from the housing.
- Pull the bulb straight from the socket to replace.
Center High Mounted Stop Lamp (CHMSL)
The stop lamp is mounted on a bracket that extends upward from the swing gate behind the spare tire. If service is needed, obtain the LED Assembly from an authorized dealer.
See below steps to replace:
- Remove the spare tire.
- Remove the screws holding the tire carrier cover.
- Remove two screws from lamp assembly and disconnect electrical connector.
License Plate Lamps
See an authorized dealer to replace LED lamps.
NOTE:
To install a new bulb, reverse the procedure above. When installing the new bulb, care should be taken to not allow bare skin to come in contact with the bulb.
 Replacement Bulbs
NOTE:
See an authorized dealer for LED bulb replacement.
NOTE:
Lens fogging can occur under certain atmospheric
conditions. This will usually clear as
atmospheric conditions change to allow the
condensation to change back into a vapor...
 TIRES
TIRES
..
Other information:
Jeep Wrangler 2018-2026 Owners Manual: Downshifting
Moving from a high gear down to a lower gear is recommended to preserve brakes when driving down steep hills. In addition, downshifting at the right time provides better acceleration when you desire to resume speed. Downshift progressively. Do not skip gears to avoid overspeeding the engine and clutch...
Jeep Wrangler 2018-2026 Owners Manual: Reprogramming A Single HomeLink® Button
To reprogram a single HomeLink® button that has been previously trained, without erasing all the channels, follow the procedure below. Be sure to determine if the new device you want to program the HomeLink® button to has a rolling code or a non-rolling code...
Categories
- Manuals Home
- Jeep Wrangler Owners Manual
- Jeep Wrangler Service Manual
- SOS Call System Limitations
- 2.0L Engine and 3.6L Engine
- Draining Fuel/Water Separator Filter — Diesel Engine
- New on site
- Most important about car
Automatic Headlights — If Equipped, Lights-On Reminder
Automatic Headlights
This system automatically turns the headlights on or off according to ambient light levels. To turn the system on, rotate the headlight switch clockwise to the last detent for automatic headlight operation. When the system is on, the headlight time delay feature is also on. This means the headlights will stay on for up to 90 seconds after you place the ignition into the OFF position. To turn the automatic system off, move the headlight switch out of the AUTO position.