Jeep Wrangler 2018-2026 Owners Manual / IN CASE OF EMERGENCY / JACKING AND TIRE CHANGING / Spare Tire Removal
Jeep Wrangler: JACKING AND TIRE CHANGING / Spare Tire Removal
- To remove the spare tire from the carrier, remove the tire cover, if equipped.
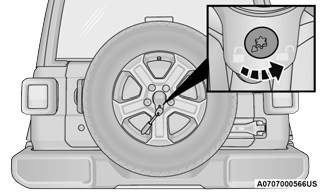
- Remove the Rear Camera Cover by turning
the lock bolt counterclockwise with the
#T40 torx head driver and ratchet from the
supplied tool kit.

Unlock Rear Camera Cover
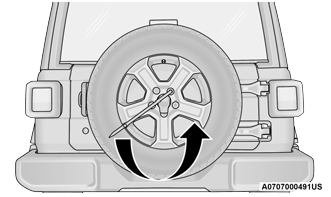
- Remove the lug nuts with the lug wrench
turning them counterclockwise. If equipped,
remove the locking lug nut with the lock key
(located in the glove box) turning it counterclockwise.

Removing The Spare Tire
 Jack Location
The jack and lug wrench are located in the rear
cargo area. To remove jack and tools proceed
as follows:
Lift the load floor in the cargo area.
Load Floor
NOTE:
The load floor can be removed for easier access
by pulling the load floor directly rearward...
 Jacking Instructions
WARNING!
Carefully follow these tire changing warnings
to help prevent personal injury or damage to
your vehicle:
Always park on a firm, level surface as far
from the edge of the roadway as possible
before raising the vehicle...
Other information:
Jeep Wrangler 2018-2026 Owners Manual: Enabling And Disabling ParkSense
ParkSense can be enabled and disabled with the ParkSense switch located below the Uconnect display. When the ParkSense switch is pushed to disable the system, the instrument cluster display will show the “PARKSENSE OFF” message for approximately five seconds...
Jeep Wrangler 2018-2026 Owners Manual: Replacement Bulbs
NOTE: See an authorized dealer for LED bulb replacement. NOTE: Lens fogging can occur under certain atmospheric conditions. This will usually clear as atmospheric conditions change to allow the condensation to change back into a vapor. Turning the lamps on will usually accelerate the clearing process...
Copyright © 2026 www.jewrangler.com
