Jeep Wrangler 2018-2026 Owners Manual / GETTING TO KNOW YOUR VEHICLE / WRANGLER TOPS / Lowering The Soft Top Into Sunrider® Position / Remove The Right And Left Quarter Windows:
Jeep Wrangler: Lowering The Soft Top Into Sunrider® Position / Remove The Right And Left Quarter Windows:
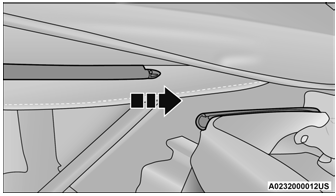
- Through the rear opening, push the bottom
corner outward and release tab from the
bottom of the window pillar.
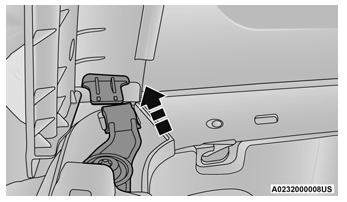
Step One
- Undo the hook-and-loop fastener located at
the upper front corner of each quarter
window.
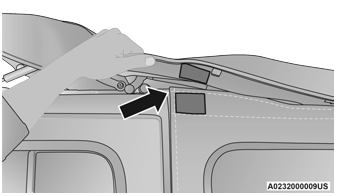
Step Two
- Starting at the rear of the vehicle, remove
plastic retainer from along the bottom of the
window moving toward the front of the
vehicle.
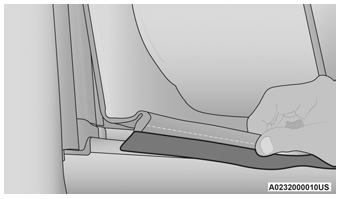
Step Three
- Remove plastic retainer from the bottom to
the top of the front window.
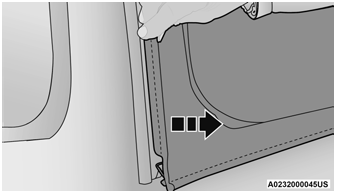
Step Four
- While keeping the window level, slide
rearward until it is completely separate from
its retainer. Do not pull downward while
removing the window. Damage to the
retainer could result.
Step Five
- Store in soft window bag (if equipped) or a
safe location.
NOTE:
For information on the use of the storage bag, refer to the next section.
 Removing The Soft Top Windows
NOTE:
Before fully lowering the soft top, the rear
window and rear quarter windows must be
removed.
Remove The Rear Window:
With the swing gate open, remove the rear
window’s plastic retainers from the lower
right and left corners...
 Soft Top Window Storage Bag — If Equipped
To safely store the soft top rear window, and
rear quarter windows, proceed as follows:
NOTE:
The swing gate bar, once removed from the rear
window, does not store in the soft window
storage bag (if equipped)...
Other information:
Jeep Wrangler 2018-2026 Owners Manual: Starting Fluids
The engine is equipped with a glow plug preheating system. If the instructions in this manual are followed, the engine should start in all conditions and no type of starting fluid should be used. WARNING! Do not leave children or animals inside parked vehicles in hot weather...
Jeep Wrangler 2018-2026 Owners Manual: On-Road Driving Tips
Utility vehicles have higher ground clearance and a narrower track to make them capable of performing in a wide variety of off-road applications. Specific design characteristics give them a higher center of gravity than conventional passenger cars...
Categories
- Manuals Home
- Jeep Wrangler Owners Manual
- Jeep Wrangler Service Manual
- SiriusXM® Satellite Radio Mode — If Equipped
- Turning FCW On Or Off
- Auxiliary Switches — If Equipped
- New on site
- Most important about car
Erasing All The HomeLink® Channels
To erase the channels, follow this procedure:
Place the ignition switch into the ON/RUN position. Push and hold the two outside HomeLink® buttons (I and III) for up to 20 seconds, or until the HomeLink® indicator light flashes.NOTE:
Erasing all channels should only be performed when programming HomeLink® for the first time. Do not erase channels when programming additional buttons.
Copyright © 2026 www.jewrangler.com