Jeep Wrangler 2018-2026 Owners Manual / GETTING TO KNOW YOUR VEHICLE / DOORS / Rear Door Removal (Four-Door Models)
Jeep Wrangler: DOORS / Rear Door Removal (Four-Door Models)
WARNING!
Do not drive your vehicle on public roads with the doors removed as you will lose the protection they can provide. This procedure is furnished for use during off-road operation only.
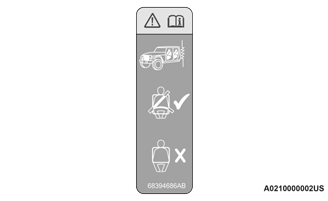
Door Removal Warning Label
WARNING!
- All occupants must wear seat belts during off-road operation with doors removed. For off-road driving tips.
- Do not store detached doors inside of the vehicle, as they may cause personal injury in the event of an accident.
NOTE:
- Doors are heavy; use caution when removing them.
- Hinge pin can break if overtightened during door reinstall (Max Torque: 7.5 ft· lb / 10 N·m). For off-road driving tips.
- Roll down the glass window to prevent any damage.
- Remove the hinge pin screws from the
upper and lower outside hinges (using a
#T50 Torx head driver).
NOTE:
The hinge pin screws and nuts can be stowed in the rear cargo tray located under the rear load floor.
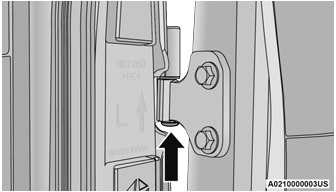
Hinge Pin Screw
- Slide the front seat(s) fully forward.
- Pry open and remove the plastic wiring
access door from the bottom of the B-pillar.
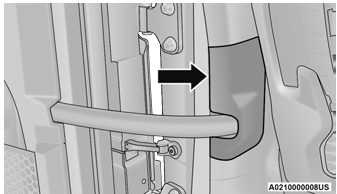
Wiring Access Door
- Unplug the wiring connector.
NOTE:
Squeeze the tab on the base of the wiring harness. This will unlock the connector tab, allowing the wiring connector to be unplugged.
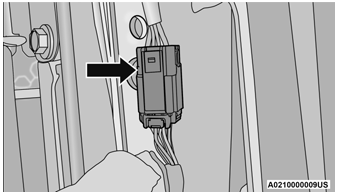
Wiring Connector
- Remove the check screw from the center
door check (using a #T40 Torx head driver).
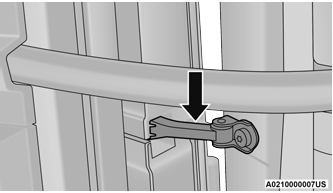
Door Check (Attached)
- With the door open, lift the door with the help of another person, to clear the hinge pins from their hinges and remove the door.
To reinstall the door(s), perform the previous steps in the reverse order.
NOTE:
The upper hinge has a longer pin, which can be used to assist in guiding the door into place when reinstalling.
 Front Door Removal
WARNING!
Do not drive your vehicle on public roads with
the doors removed as you will lose the
protection they can provide. This procedure is
furnished for use during off-road operation
only...

Other information:
Jeep Wrangler 2018-2026 Owners Manual: Heated Mirrors and Power Mirrors — If Equipped
Heated Mirrors These mirrors are heated to melt frost or ice. This feature will be activated whenever you turn on the rear window defroster (if equipped). Power Mirrors Power Mirror Switch The power mirror controls consist of mirror select buttons and a four-way mirror control switch...
Jeep Wrangler 2018-2026 Owners Manual: Lower Anchors And Tethers For CHildren (LATCH) Restraint System
LATCH Label Your vehicle is equipped with the child restraint anchorage system called LATCH, which stands for Lower Anchors and Tethers for CHildren. The LATCH system has three vehicle anchor points for installing LATCH-equipped child seats. There are two lower anchorages located at the back of the seat cushion where it meets the seatback and one top tether anchorage located behind the seating position...
Categories
- Manuals Home
- Jeep Wrangler Owners Manual
- Jeep Wrangler Service Manual
- 2.0L Engine and 3.6L Engine
- Auxiliary Switches — If Equipped
- Turning FCW On Or Off
- New on site
- Most important about car
REMOTE START — IF EQUIPPED (DIESEL)
Copyright © 2026 www.jewrangler.com