
Jeep Wrangler 2018-2026 Owners Manual / GETTING TO KNOW YOUR VEHICLE / WRANGLER TOPS / Hard Top Front Panel(s) Removal
Jeep Wrangler: WRANGLER TOPS / Hard Top Front Panel(s) Removal
Use this QR code to access your digital experience.
CAUTION!
- The hard top is not designed to carry any additional loads, such as after-market roof racks, spare tires, building materials, hunting or camping supplies, etc. For optional Mopar® accessory roof racks.
- Do not move your vehicle until the top has been either fully attached to the front header, sport bar, and body side or fully removed.
Failure to follow these cautions may cause interior water damage, stains or mildew:
- It is recommended that the top be free of water prior to panel removal. Removing the top, opening a door or lowering a window while the top is wet may allow water to drip into the vehicle’s interior.
- The hard top assembly must be positioned properly to ensure sealing. Improper installation can cause water to leak into the vehicle’s interior.
- Careless handling and storage of the removable roof panels may damage the seals, causing water to leak into the vehicle’s interior.
- The front panel(s) must be positioned properly to ensure sealing. Improper installation can cause water to leak into the vehicle’s interior.
 Installing The Soft Top
If currently installed, remove the hard top.
Install the door rails, starting with the front,
followed by the rear on each side. For
instructions and appropriate torque specifications
for the door rail Torx screws...
 Hard Top Components
Four Door Hard Top Components
Right Side Panel
Left Side Panel
Hard Top
Two Door Hard Top Components
Right Side Panel
Left Side Panel
Hard Top
NOTE:
All hard top removal and installation instructions
are applicable to both two and four door
model vehicles...
Other information:
Jeep Wrangler 2018-2026 Owners Manual: Anti-Lock Brake System (ABS) Warning Light
This warning light monitors the ABS. The light will turn on when the ignition is placed in the ON/RUN or ACC/ON/ RUN position and may stay on for as long as four seconds. If the ABS light remains on or turns on while driving, then the Anti-Lock portion of the brake system is not functioning and service is required as soon as possible...
Jeep Wrangler 2018-2026 Owners Manual: Opening And Closing The Power Top
Express Open/Close Push the open switch and release it within one-half second and the power top will open automatically from any position. The power top will open fully and stop automatically. Push the close switch and release it within one-half second and the sunroof will close automatically from any position...
Categories
- Manuals Home
- Jeep Wrangler Owners Manual
- Jeep Wrangler Service Manual
- Manual Front Seat Recline Adjustment
- WHEEL AND TIRE TORQUE SPECIFICATIONS
- SOS Call System Limitations
- New on site
- Most important about car
Manual Front Seat Forward/Rearward Adjustment
The seat can be adjusted forward or rearward by using a bar located by the front of the seat cushion, near the floor. While sitting in the seat, lift up on the bar located under the seat cushion and move the seat forward or rearward. Release the bar once you have reached the desired position. Then, using body pressure, move forward and rearward on the seat to be sure that the seat adjusters have latched.
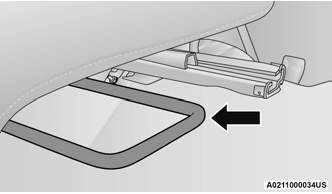
Adjustment Bar Location

Copyright © 2026 www.jewrangler.com