Jeep Wrangler 2018-2026 Owners Manual / GETTING TO KNOW YOUR VEHICLE / DOOR FRAME / Door Frame Removal
Jeep Wrangler: DOOR FRAME / Door Frame Removal
NOTE:
In four door models, the rear door frames must be removed first, followed by the front door frames.
- Using the provided #40 Torx head driver
and ratchet, loosen the Torx screws
located on the underside of each door
frame (two per door).

Door Frame Screw Locations
- Once all the way loosened, remove the
screws by pulling downward.
NOTE:
Screws will not fall out once completely loose, as they are held in place by an internal mechanism.
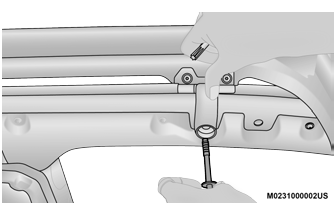
Remove Screws From Below Frame
- Lift the frame upward, removing it from the
vehicle.
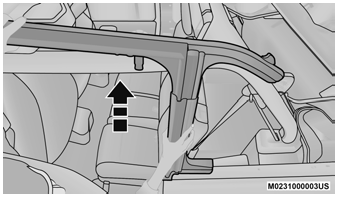
Step Three
- Store screws in a secure location.
- Repeat procedure on the front door frame (four door models).
WARNING!
- Do not drive your vehicle on public roads with the door frame(s) removed as you will lose the protection that they can provide. This procedure is furnished for use during off-road operation only.
- Do not drive your vehicle on public roads with the doors removed as you will lose the protection that they can provide. This procedure is furnished for use during off-road operation only.
 DOOR FRAME
WARNING!
Do not drive your vehicle on public roads
with the door frame(s) removed as you will
lose the protection that they can provide.
This procedure is furnished for use during
off-road operation only...
 Door Frame Installation Four Door Models — If Equipped
Install the front door rail first.
Carefully place the front door rail in the
rubber seal at the top of the windshield, and
line up the holes for the Torx head screws
(two for each door)...
Other information:
Jeep Wrangler 2018-2026 Owners Manual: Rear Quarter Window Removal
On vehicles equipped with a Power Sliding Top, the rear quarter windows can be removed. To remove these windows, follow the procedure below: Open the swing gate, and lift the rear window. Open both side doors nearest the quarter windows. Locate the rear quarter window latches (two on each window) on the interior of the windows...
Jeep Wrangler 2018-2026 Owners Manual: CRUISE CONTROL SYSTEMS — IF EQUIPPED
Your vehicle may be equipped with the Cruise Control system, or the Adaptive Cruise Control (ACC) system: Cruise Control for cruising at a constant preset speed. Adaptive Cruise Control (ACC) for maintaining a set distance between you and the vehicle ahead using Fixed Speed Cruise Control to automatically adjust the preset speed...
Categories
- Manuals Home
- Jeep Wrangler Owners Manual
- Jeep Wrangler Service Manual
- UCONNECT SETTINGS
- The ASSIST and SOS Call Buttons On Your Rearview Mirror Or Overhead Console
- Jack Location
- New on site
- Most important about car
Erasing All The HomeLink® Channels
To erase the channels, follow this procedure:
Place the ignition switch into the ON/RUN position. Push and hold the two outside HomeLink® buttons (I and III) for up to 20 seconds, or until the HomeLink® indicator light flashes.NOTE:
Erasing all channels should only be performed when programming HomeLink® for the first time. Do not erase channels when programming additional buttons.
Copyright © 2026 www.jewrangler.com