Jeep Wrangler: FOLDING WINDSHIELD / Lowering The Windshield
- Before completing the steps below:
- If your vehicle is equipped with a Soft Top, the top MUST be lowered, and the door rails must be removed prior to lowering the windshield.
- If your vehicle is equipped with a Hard Top, the Freedom Panels MUST be removed prior to lowering the windshield.
- Refer to the following instructions for more information:
-
- Soft Top Lowering
- Door Frame
- Freedom Top Panels
CAUTION!
Failure to follow this step will cause damage to the vehicle’s header seal.
- Manually remove the protective caps over
the windshield wiper hex bolts.
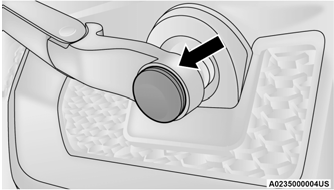
Step Two
- Using the provided 15 mm socket, remove the two hex bolts and remove the wiper arms.
- Move to the inside of the vehicle and lower both sun visors.
- Using the provided #40 Torx head driver,
remove the four Torx screws located along
the interior of the windshield.
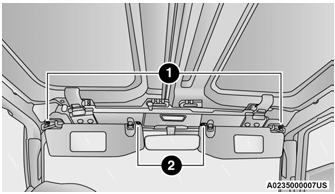
Step Five
-
Outside Torx Screws
-
Inside Torx Screws
NOTE:
Store all of the mounting bolts in their original threaded holes and tighten for safekeeping.
-
- Lower the windshield gently until it contacts
the tie-down bumpers (if equipped).
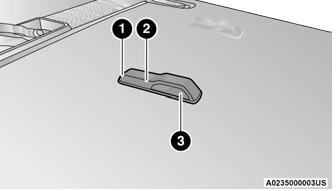
Step Six
-
Washer Nozzle
-
Bumper
-
Tie-Down
-
- Secure the windshield by passing a cinch
strap through the tie-down on either side of
the hood and on the windshield frame.
Tighten the strap to secure the windshield
in place.
CAUTION!
Do Not Overtighten! Damage to the windshield could result.
ACC/FCW Sensor Protective Cover — If Equipped
Your vehicle may be equipped with a protective cover that is to be used whenever the windshield is folded down in order to protect the Adaptive Cruise Control (ACC)/Forward Collision Warning (FCW) sensor. To install the cover, follow the instructions below:
- Secure the top part of the cover so that it hinges to the header.
- Swing the cover down and push on it so that it covers the opening.
- Check to make sure the cover is secured properly.
NOTE:
Be sure to remove the cover before returning the windshield to the normal position. Store the cover in the cargo area.
Cleaning Instructions
During windshield down applications, dust/dirt can accumulate in the cover and block the camera lens. Use a microfiber cloth to clean the camera lens, module, and inside cover, being careful not to damage or scratch the module.
 FOLDING WINDSHIELD
CAUTION!
Lowering of the windshield is NOT
recommended in vehicles equipped with a
Power Sliding Top. Damage will occur to the
top as well as the header seal...
 Raising The Windshield
Release the strap that secured the
windshield in the lowered position.
Raise the windshield.
Using the provided #40 Torx head driver,
reinstall the four Torx screws located along
the interior of the windshield...
Other information:
Jeep Wrangler 2018-2026 Owners Manual: Drivetrain
T..
Jeep Wrangler 2018-2026 Owners Manual: Coolant Level
The coolant bottle provides a quick visual method for determining that the coolant level is adequate. With the engine OFF and cold, the level of the engine coolant (antifreeze) in the bottle should be between the ranges indicated on the bottle. The radiator normally remains completely full, so there is no need to remove the radiator/ coolant pressure cap unless checking for engine coolant freeze point or replacing coolant...
Categories
- Manuals Home
- Jeep Wrangler Owners Manual
- Jeep Wrangler Service Manual
- Manual Front Seat Recline Adjustment
- How To Use Remote Start
- SOS Call System Limitations
- New on site
- Most important about car
Bi-Level Mode
 Air comes from the instrument
panel
outlets and floor outlets. A slight
amount of air is directed through the
defrost and side window demister
outlets.
Air comes from the instrument
panel
outlets and floor outlets. A slight
amount of air is directed through the
defrost and side window demister
outlets.
NOTE:
Bi-Level mode is designed under comfort conditions to provide cooler air out of the panel outlets and warmer air from the floor outlets.